UX Design Documentation Guide
August 1, 2023

As a UX designer, you’ve probably done plenty of specs and redlining, but you might not have written much structured documentation about your design decisions and process.
While it might seem like snooze-worthy work you don’t have time for, prioritizing the practice of writing stuff down is well worth the effort. By documenting your work, you’ll bring order to the software development chaos, feel awesome about what you’ve accomplished, and collaborate better with the whole team. Design documentation is especially crucial when you’re working on complex feature sets for enterprise UX workflows, with many stakeholders and users involved.
If you’re not sure where to begin when it comes to design documentation, look no further: in this article, we’re serving hot tips on how to document your stuff and be more successful in your design work.
Let’s kick things off with a definition: Design documentation is a set of documents and resources that record the unique process involved in creating, working on, measuring, and iterating a new feature.
With design documentation, you aren’t just writing documents about something you know or about what should be done. Rather, you’re logging what you’ve actually done and why you did it.
You can document things like:
Product design documentation isn’t just for devs: it’s for YOU. It allows you to reflect on your design choices and log your thoughts for later (your future self will thank you 🔮).
But you don’t work in a bubble—UX design impacts everyone in the organization, and documenting your work benefits other teams involved in the process, like product and marketing.
Let’s say you document your design principles (more on that later), explaining why they exist and how they’ll be acted out. The VP of product can use those principles to write a blog post alluding to what’s coming up, and the marketing team can use them to brainstorm taglines for the next product. #teamworkmakesthedreamwork.
Design documentation represents how you’re manifesting and acting out the product strategy. It explains how your design supports the higher level intention of the product and who you’re building the product for. You know, the important stuff.
What’s more, documentation acts as a source of truth, getting everyone on the same page with product strategy and design decisions.
Documenting your thought process while designing is like telling your design story—and it helps you find your plot holes. Did you cover everything in this project? Are there any missing pieces? Why did you make certain choices? How did you get to where you are now?
By writing things down, you avoid missing any crucial details, big and small. It’s like QAing your own work.
There are plenty of different platforms you can use for design documentation, like Confluence, Notion, and Figma, to name a few. Whichever tool you pick, it’s good to have a legit place for textual documentation. Your floating post-its in Figma, for example, can easily be moved and deleted by someone else.
Together with your team, figure out the best way to organize your shared workspaces so that everyone has access to the documentation, but no one can accidentally change or delete important notes.
There’s no perfect formula for design documentation—your approach will be unique to your team and culture. But here’s the key stuff you need to include regardless of how you structure your docs.
When designing a brand new feature set, be super clear about why you’re building it, what audience you’re targeting, and where the feature plugs in. In other words, outline the product strategy context.
This info often comes from the design brief, which covers the goals and intention of what you’re trying to achieve. In your documentation, show how these higher level goals sprinkle into your design methods and mechanisms—the “how” of the product strategy.

This document intended to give the overall team a sense of the feature epics and what they involved. We included the goal and assumptions.
Find yourself re-communicating the same quick fixes and solutions to your dev team over and over again? That’s something you should document in your design system as a high-level rule.
For example, you might stumble upon the perfect breakpoint logic while working on a specific page during a sprint. When you consistently apply that same structure to other pages with breakpoint problems, that becomes a pattern worth documenting and communicating to the team.
Be sure to differentiate the decisions that are local vs. global, since some things will apply to specific pages or features for a super specific user subset. As you continue to work with the product, the global things will become clear.
While a spec document outlines the “what” of UX design, your design rationale explains why you did what you did. Documenting your design rationale involves logging all key decisions relating to the product or feature you’re working on.
Your design rationale is likely in a constant state of flux as you build, so it’s easy to forget your thinking process along the way. That’s why meticulously logging your design decisions is essential. Of course, you don’t need to log your every thought, but include the key decisions that show how you arrived at the final deliverable.
Point out any cases where there are unknowns with your rationale, and clarify your confidence level. You can say, for instance, “We haven’t figured this out yet, but we’re building this so we can test whether it works.”
🧓☝️However, if you can’t explain why you did something, especially when it’s consequential, that’s a red flag. As designers, we need to think both abstractly and concretely, using our imagination and multiple data points when coming up with new ideas. Understanding your thinking process is a key part of your practice that you can’t ignore.
The upside is that being able to recognize your real-time thinking helps you articulate it better and uncover any holes and problems in your reasoning. Half of our job is being wrong, so get hip to that 😉
Closely related to your design rationale, design principles are guidelines that help your team stay aligned as you build products or features. They help you make design decisions that prioritize the project objectives. For example, one design principle might be to make information readily available, and you act that out by sharing sophisticated tool tips and creating a design convention of using tooltips to define jargon and acronyms.
Documenting your design principles makes them official. Once you’ve written down these foundational pillars, you can move onto documenting the nitty-gritty stuff.
Leave yourself a papertrail that reflects your thoughts for future versions—especially when designing bigger feature sets. Capture your design decisions early on so that you can refer to them when you’re working on the next versions of your product. It’s so much easier to come back to a feature set when you have a clear sense of what you were doing and what the next steps were.
Documenting your thoughts for future versions also ensures continuity with the experience users have gotten used to. You might do versioning on the fly, so just make sure devs don’t see future stuff and think it’s in scope.
We’ve talked about including high-level stuff in your design documentation (which are surprisingly easy to forget), but you also want to cover the edge cases. What are the wacky and weird situations that might arise? 🤪
Ask yourself: would you rather find an edge case when you’re still making mockups, or when the due date is tomorrow and you’re pushing to production? If you don’t give yourself time for this early on, it’ll be most costly and time-intensive to fix later.
Save yourself the crises and document the edge cases for layouts and super interactive stuff. Involve QA in this process—they’re really good at finding edge cases and breaking stuff. 🕵️
Next, let’s walk through some tips for how to go about documenting your design decisions.
If you haven’t already integrated documentation into your workflow, it’s time to shift your mental model and make it a key part of your role as a designer. Be disciplined, and take a slow and steady approach when documenting your design.
Ease yourself into the process by starting with some simple steps. For instance, the next time you create wireframes, jot down explanations for each design choice on sticky notes.
Have a session with your team to go through what everyone expects to see in design documentation. Approach it from different angles, and ask the crew:
Chances are, the team already has ways of documenting things—you’re not starting from complete scratch, but you’re exchanging information and ideas about how to improve documentation.
After this session, decide on a realistic middle ground for documentation that works for everyone. Avoid time-consuming documentation practices like extracting screenshots from your design tool into yet another place that you’ll need to keep manually updating.
Create a documentation template that designers can use whenever they start something new. This way, your documentation is sure to be useful and consistent, and you don’t need to reinvent the wheel every time.
Don’t forget to involve QA here too—they need to know the ins and outs of the design even if they don’t attend all the feature kick offs and estimation meetings.
If you jump straight into the granular stuff in your design documentation, you leave a lot of gaps for people to fill in themselves. First, take a step back to show the bigger picture and the navigational context, i.e. where you came from and how you got there.
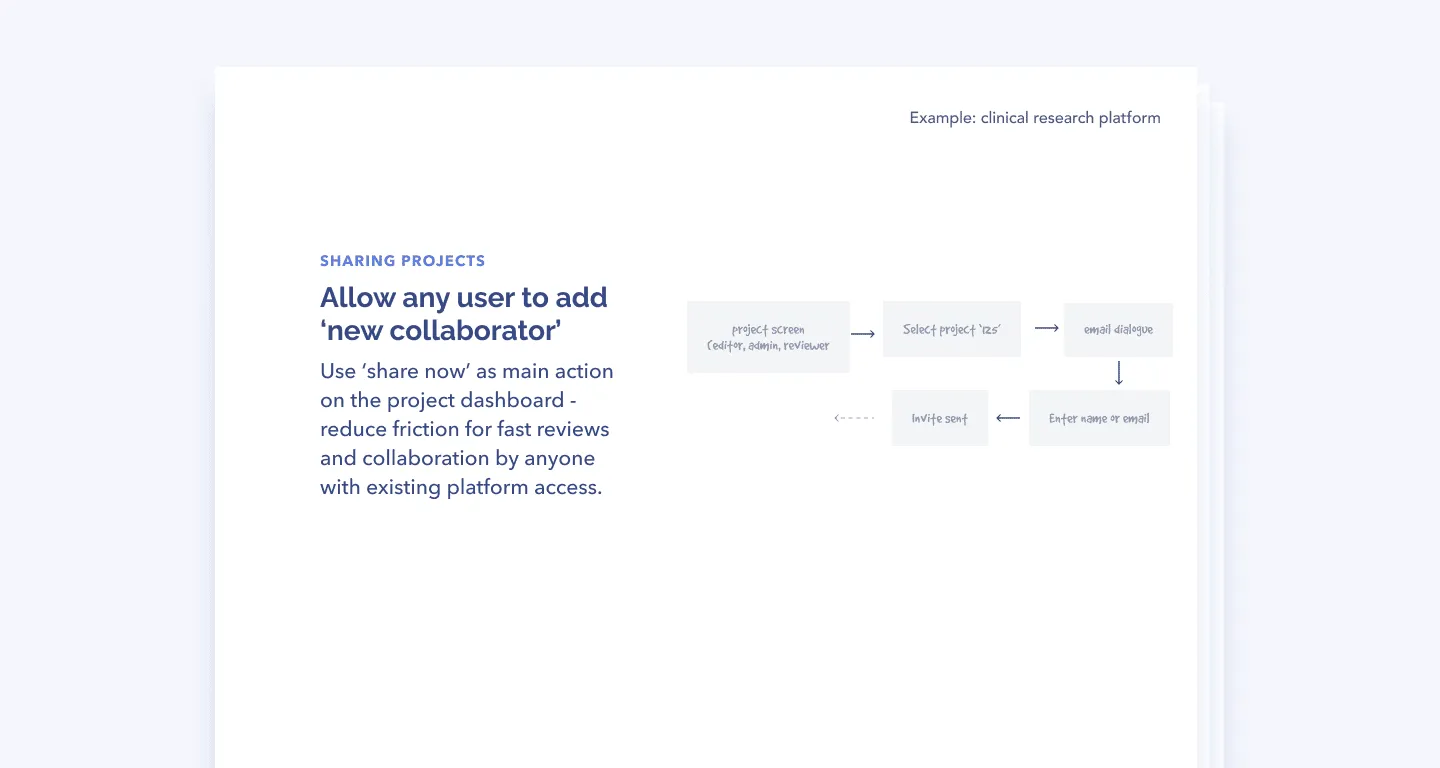
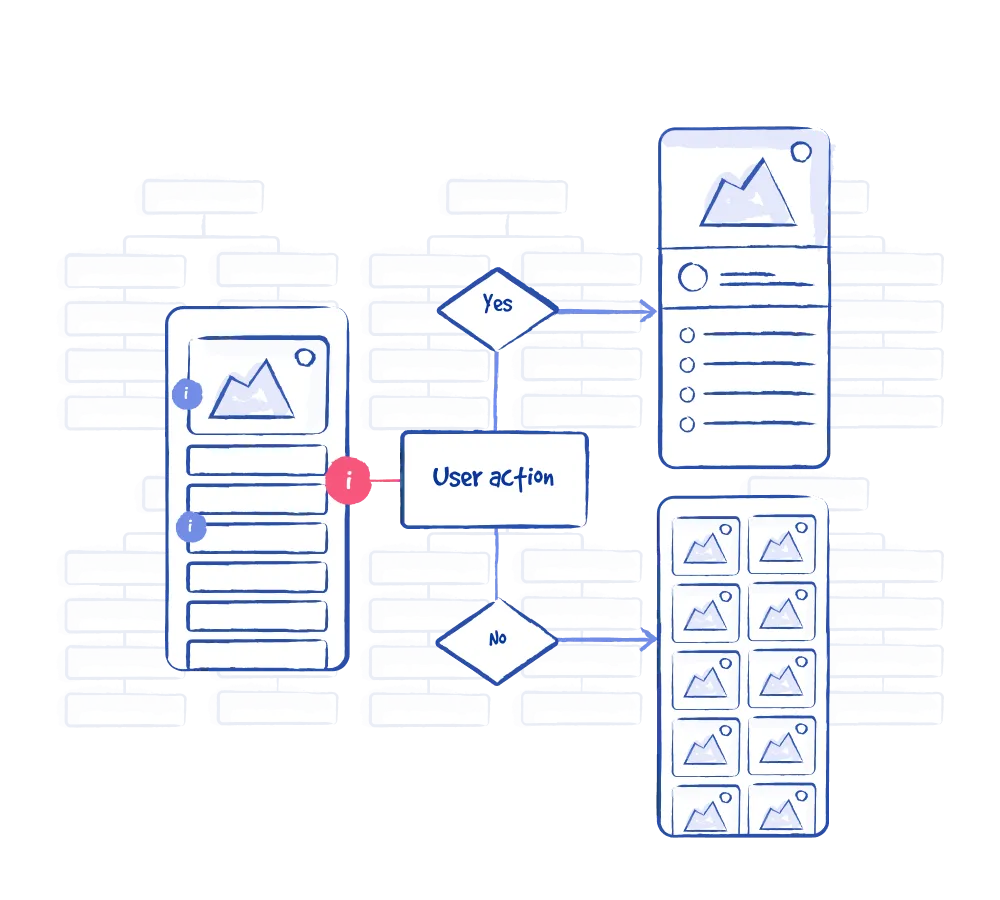
Introduce new features with a low-fidelity flowchart—everyone loves a good flowchart 😍 They get people warmed up and show how the new thing you’re building fits within the existing user flow. Since mockups and prototypes often start right in the meat of things, it’s all too easy to create something new and forget to give it a home. To avoid your new features and workflows from getting lost in the abyss, communicate where it plugs in (like a menu or submenu), why it makes the most sense there, and how users can reach it (the entry point).
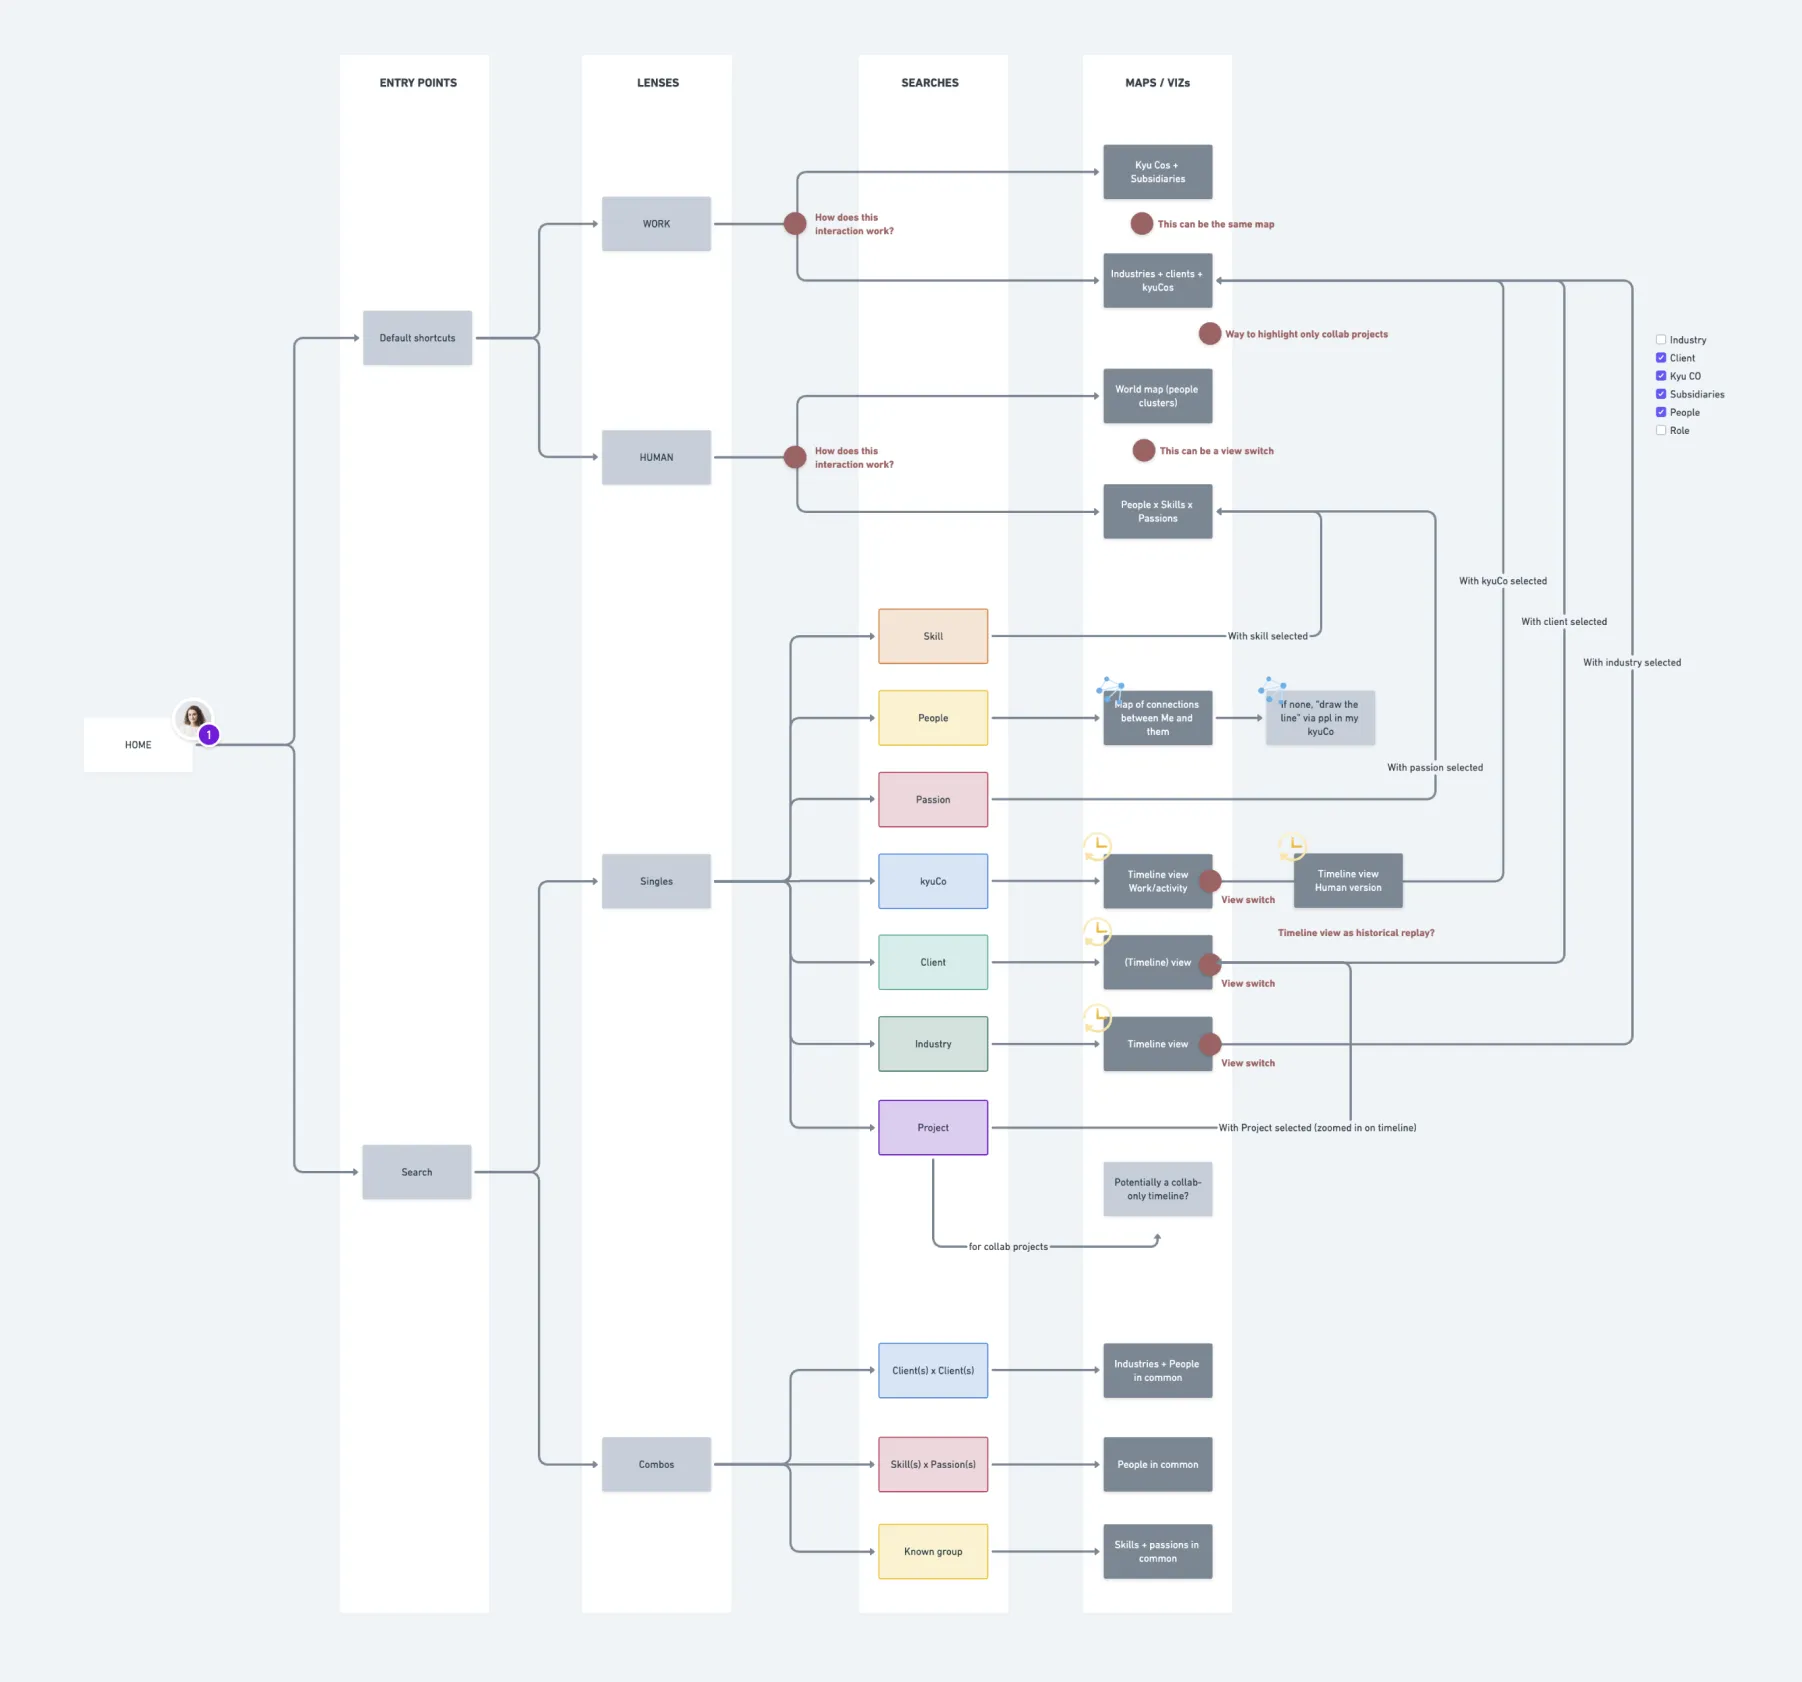
Use a matrix for interaction documentation with conditional logic. This is especially useful when you have many states. For example, if you are part of a community, then you’ll see this type of phrase. If you share the link with one person, then you’ll see this message. If you share it with two people, then you’ll see this other message, and so on. In your matrix, be explicit about what’s a new feature and what’s a redesigned feature.
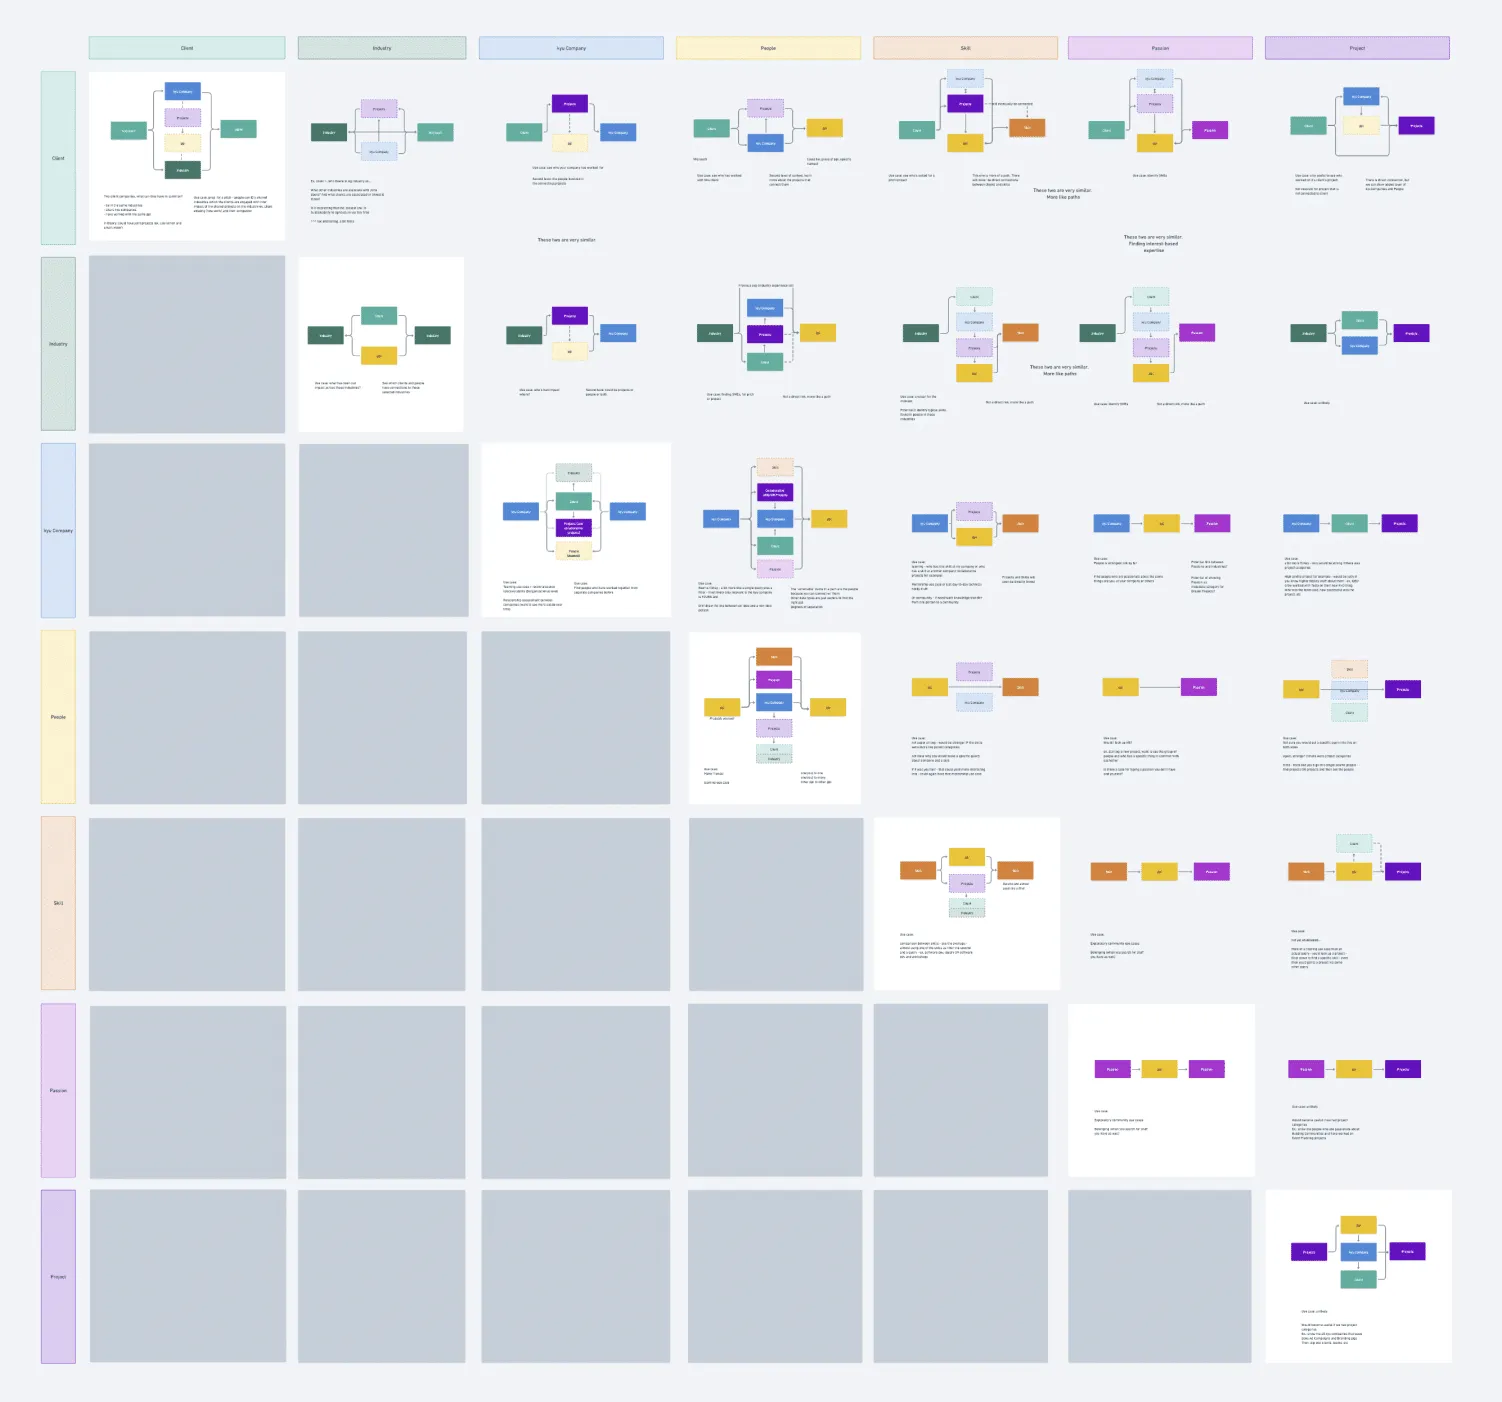
We used this matrix to better visualize how our different data types related to each other. Notice how colour-coding can be pretty and useful!
It’s much easier and efficient to represent all the variables in a matrix instead than of writing them out in a long-form text. You don’t want to have people deduce anything—QA will be logging in to your prototype with different user settings, and they need to refer to one source of truth.
Get meta and document the documentation. 🤓As a UX designer, you’re used to the tools you use every day, but not everyone knows all the features inside out. To make your documentation inclusive and transparent, tell people how to use the software and where to to find what. For example, say “If you’re looking for the main component, use this button—it’ll bring you to the right place in the design system.”
You might want to name one mega document your “design document,” and have conventions and nomenclature for your file structure. Are there any special words you’re using? Create a glossary for all those specific terms, as well as for the abbreviations you use (so no one’s left wondering WTF is a KWHL?!)
Make your documentation appropriate for your audience. Sometimes it’s just devs and product people, and sometimes it’s the whole company. You can create a landing page in the prototype so that wherever people start, they’ll land on a table of contents that shows how to use the prototype.
Design documentation requires a fine balance of time and effort. You don’t need to create super fancy web pages with embedded prototypes—documentation should be easy to produce—but you do need to put some elbow grease into it.
If you find yourself saying “We don’t have time to document anything, ever,” that’s a problem. It’s like saying “We don’t have time to think things through at any level, ever.” If you don’t make time for documenting your design rationale or process as you go through versioning, you’ll lose all that effort you put in. And we bet you’re a smart cookie and had some good thinking along the way!
Design documentation ensures you never have to start from a blank page again. The beauty of knowledge work is that you can pick up from the last person or from your past self. When you share knowledge with the organization, you gain clarity, save hours on design work, make well-informed decisions, and work better as a team.
Do a mini UX audit on your table views & find your trouble spots with this free guide.

Be the first to know about our upcoming release!


.webp)

.webp)

